1Getting Started
Interface Overview
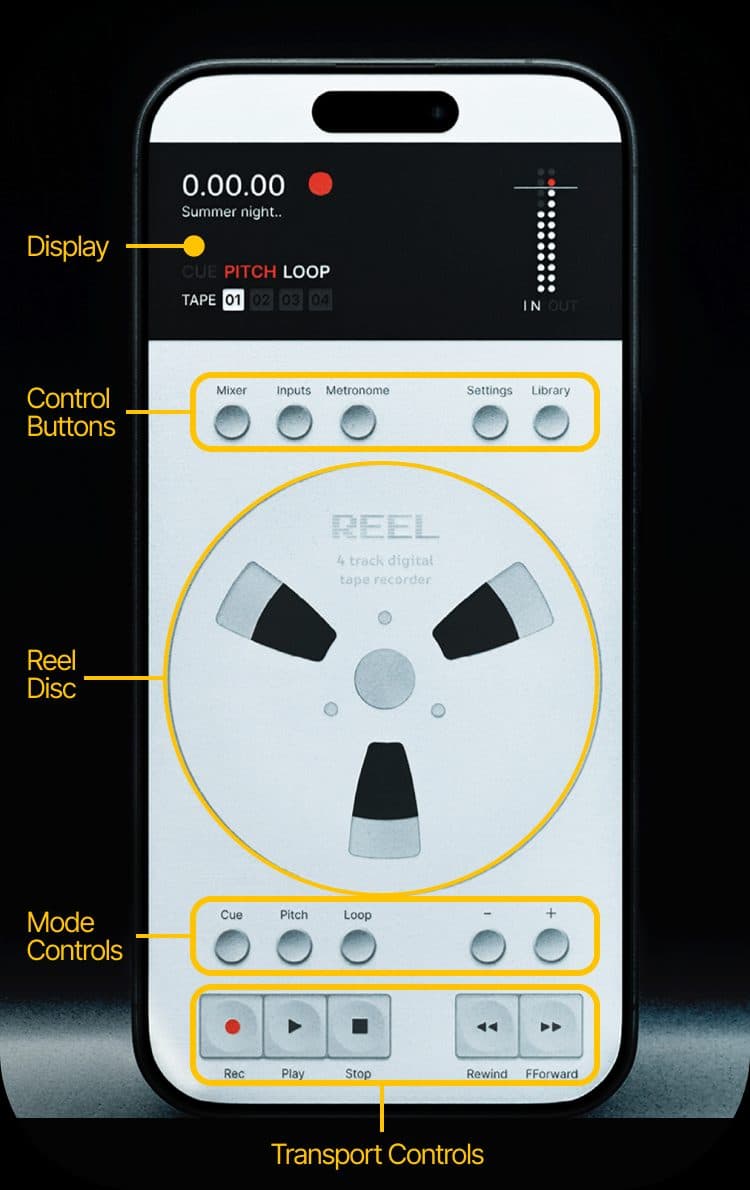
Reel's interface is organized into five zones, from top to bottom:
- Display Panel - Timecode, track info, mode indicators, and level meters
- Control Buttons - Five circular buttons: Mixer, In/Out, Tempo, Settings, and Library
- Reel Disc - The large central disc for scrubbing and pitch control
- Mode Controls - CUE, PITCH, and LOOP mode buttons with +/- controls
- Transport Controls - Record, Play, Stop, Rewind, and Fast Forward
Your First Recording
- Open Reel and grant microphone access when prompted.
- Tap REC to start recording. A red dot appears next to the timecode.
- Tap STOP to finish. Your recording is saved automatically.
- Tap PLAY to listen back. Rotate the disc to scrub through the audio.
Leaving and Returning
Reel keeps running in the background so your work is preserved when you switch apps or the screen locks. How the app behaves depends on what you were doing:
- Playing back - Audio keeps playing through your speaker or headphones, just like a music app. Control from the lock screen or Control Center.
- Recording - Recording continues in the background. If a phone call, Siri, or alarm interrupts, the take is automatically finalized and saved.
- Idle - The microphone is released and the orange mic indicator drops. No battery drain.
2Display Panel
Timecode
The large timecode display shows the current position in H.MM.SS format (hours.minutes.seconds). During playback, the display scrolls smoothly to show fractional seconds.
Track Name & Status
Below the timecode, the display shows the current track name or status message. Status overlays appear for 2 seconds when actions are triggered (e.g., "PLAY", "STOP", "CUE 001"). During recording, the display shows the recording mode and target track:
| State | Display |
|---|---|
| Fresh reel recording | NEW REEL REC |
| Recording to empty track | REC TR [1-4] |
| Overdubbing over existing audio | OVERDUB TR [1-4] |
| Punch-in mid-track | PUNCH TR [1-4] |
Recording Indicator
A red dot appears next to the timecode whenever recording is active.
Sample Rate Indicator
The current project sample rate is shown below the track name. If the connected audio source is running at a different sample rate, an arrow and red text appear (for example, 48kHz → 96kHz), indicating that Reel is converting the input rate to match the project. This is automatic and lossless.
Mode Indicators
Three labels - CUE, PITCH, and LOOP - show the current state of each mode:
- Grey - Mode is off
- Red - Active / recording / adjusting
- White - Locked / navigate / playback
Track Selector
Four numbered boxes (01–04) show which track is currently selected. The active track is highlighted.
Level Meters
Dual-channel (L/R) level meters sit on the right side of the panel, with a dedicated clip indicator at the top of the scale.
During recording, the IN label lights up and the meter shows your stereo input level. The input meter follows the tracks with input monitoring enabled (controlled by the "I" buttons in the Mixer), so it reflects what you actually hear.
During playback, the OUT label lights up showing output levels.
3Quick Reference
Every action at a glance:
| Action | How |
|---|---|
| Record | Tap REC |
| Pause recording | Tap REC during recording |
| Resume recording | Tap REC while paused |
| Play / Pause | Tap PLAY |
| Stop | Tap STOP |
| Reset to beginning | Double-tap STOP |
| Rewind | Hold REW (speed ramps up) |
| Fast forward | Hold FF (speed ramps up) |
| Scrub audio | Rotate the disc |
| Select track | +/- buttons (no mode active) |
| Create new project | Hold STOP + tap PLUS |
| Delete track | Hold STOP + tap MINUS |
| Add cue point | CUE mode (red) → tap + |
| Delete last cue | CUE mode (red) → tap - |
| Jump between cues | CUE mode (white) → +/- |
| Play from cue | CUE mode (white) → PLAY |
| Set loop IN | LOOP mode (red) → tap + |
| Set loop OUT | LOOP mode (red) → tap - |
| Adjust pitch/speed | PITCH mode (red) → rotate disc |
| Lock pitch | Tap PITCH again (goes white) |
| Reset pitch | Tap PITCH to cycle back to Off |
4The Reel Disc
The reel disc is the centerpiece of the interface - a rotary control that behaves like a physical tape reel.
| Gesture | Action |
|---|---|
| Touch & hold | Pause playback at current position (haptic feedback on contact) |
| Drag / rotate | Scrub through the audio timeline - like rewinding or advancing tape |
| Flick & release | Momentum scrubbing - the disc continues spinning with natural deceleration |
| Rotate in Pitch mode | Adjusts playback speed (25% to 300%) instead of position |
Scrubbing stops automatically at the start and end of the audio - it won't wrap around.
5Transport Controls
The transport bar at the bottom of the screen provides the core recording and playback controls.

REC (Record)
- Tap to start recording. The display shows "NEW REEL REC" and a red dot appears.
- Tap again during recording to pause. Tap once more to resume.
- When recording to Tracks 2–4, Track 1 plays back simultaneously (overdub).
PLAY
- Tap to start playback. Tap again to pause.
- In CUE Navigate mode, playback starts from the currently selected cue point.
- Tap PLAY while recording to finalize the recording and immediately begin playback.
STOP
- Single tap - Stops playback or recording. Position stays where it is.
- Double tap - Stops and resets position to the beginning (0:00:00).
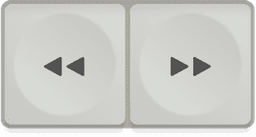
REW (Rewind)
- Hold to rewind. Speed starts at 1x and ramps up to ~10x over one second.
- Release to decelerate smoothly back to normal speed.
- You can switch directly from Rewind to Fast Forward without releasing first.
FF (Fast Forward)
- Hold to fast forward. Same speed ramping as Rewind.
- Release to decelerate. Supports mid-press direction switching.
6Mode Controls
Three mode buttons sit between the disc and transport controls. Each cycles through three states. The +/- buttons on either side change behavior depending on which mode is active.
CUE Mode
Tap the CUE button to cycle: Off → Add/Delete → Navigate → Off
| State | + Button | - Button |
|---|---|---|
| Off (grey) | Next track | Previous track |
| Add/Delete (red) | Add cue point at current position | Delete last cue point |
| Navigate (white) | Jump to next cue | Jump to previous cue |
PITCH Mode
Tap PITCH to cycle: Off → Adjusting → Locked → Off
| State | Behavior |
|---|---|
| Off (grey) | Normal playback at 1.0x speed |
| Adjusting (red) | Disc rotation controls speed (25%–300%). Display shows "PITCH ADJ" |
| Locked (white) | Speed is locked. Disc returns to scrubbing. Display shows "PITCH ±##%" |
LOOP Mode
Tap LOOP to cycle: Off → Recording → Playback → Off
| State | + Button | - Button |
|---|---|---|
| Off (grey) | Next track | Previous track |
| Recording (red) | Set loop IN point | Set loop OUT point (or clear loop if both set) |
| Playback (white) | Audio loops seamlessly between IN and OUT. Display shows loop duration. | |
7Recording
Recording a Fresh Reel
With no existing recording loaded, open the Mixer to arm tracks for recording. The R buttons are toggles - arm any combination of tracks. Arm all 4 and press REC to capture all tracks simultaneously (multi-track recording). The display shows "NEW REEL REC".
Layering Tracks Step-by-Step (Overdub)
To build up a recording one track at a time (overdubbing), use the +/- track selector together with the transport buttons. You do not need to open the Mixer for this flow, and it works the same way whether you are recording through the built-in iPhone microphone or a connected input. Each take goes onto its own track, not on top of the previous one.
- Tap REC to start recording on Track 1.
- When you are finished, tap STOP twice - once to stop, once more to rewind to the start. The TRACK indicator near the top of the display shows which track is active.
- Tap + to advance to Track 2. The TRACK indicator moves from 01 to 02.
- Tap REC again. Track 1 plays back through your headphones (or speaker) while Track 2 records your new take.
- Repeat steps 2 to 4 to fill Tracks 3 and 4.
- Open the Mixer to adjust volume, pan, mute, or solo each track independently.
Overdub Recording
With an existing recording loaded, the R buttons in the Mixer become radio buttons - only one track can be armed at a time. Tapping R on a different track automatically disarms the others. Select the target track and tap REC. Existing tracks play back through your headphones while the new track records. The display shows "REC TR 2" for an empty track, or "OVERDUB TR 2" when recording over existing audio.
Punch-In Recording
Seek to the position you want to re-record (using the disc or cue navigation), select the target track, and tap REC. The original audio from that point forward is temporarily replaced with your new recording. When you stop, the punch recording is spliced seamlessly into the original track. The display shows "PUNCH TR 2".
Pause & Resume
During recording, tap REC to pause. The position is maintained. Tap REC again to resume recording from the same point.
Tempo & Count-In
Tap the Tempo button to open the Tempo sheet. Options include:
- Enable - Turns the click track on or off.
- Count-In - Plays a count before recording starts. Choose 1, 2, or 4 bars.
- Tempo - Slider-based BPM adjustment.
- Tap Tempo - Tap a button rhythmically to set the tempo to match what you are playing.
- Volume - Independent click volume control.
When count-in is active, pressing REC triggers the count at your set BPM before recording begins. The display shows "COUNT" during the count-in.
Multi-Input Recording (USB Audio Interface)
Connect a USB audio interface to record up to 8 input channels (4 stereo pairs) simultaneously to separate tracks. Reel auto-routes stereo pairs to tracks on first connect, so you see input signal immediately. Configure input routing in the In/Out panel if needed. Each input pair maps to a track (1-4).
8Playback
- Tap PLAY to start. Tap again to pause. All tracks in a project play simultaneously.
- Use the disc to scrub to any position before or during playback.
- Hold REW or FF for speed-ramped navigation (up to ~10x).
- Enable variable speed via PITCH mode (25%–300%) - speed persists when locked.
- In LOOP Playback mode, audio loops seamlessly between your IN and OUT points.
9Mixer
Tap the Mixer button to open the 4-track mixer panel. Each track has independent controls:
- Volume - Vertical slider (0-100%). The orange fill shows the current level.
- Pan - Horizontal slider from L (left) to R (right). Center is the default.
- Mute (M) - Turns red when active. Silences the track completely.
- Solo (S) - Turns white when active. Mutes all other non-soloed tracks. Solo overrides Mute on the same track the way it does on a real desk - if a track is both muted and soloed, you still hear it.
Double-tap any channel to reset its volume, pan, mute, and solo to their defaults. Mixer state (volume, pan, mute, solo) saves with each project, so your settings stay put between sessions. Open a project from the library and your mix comes back as you left it.
Record Arm (R)
When a USB audio device with 2 or more input channels is connected, the R buttons control which tracks will record when you press REC. Their behavior changes depending on the project state:
- Fresh reel (no recordings) - R buttons are toggles. Arm any combination of tracks for multi-track recording.
- Existing recording - Once any track has audio (whether you just recorded it or opened it from the library), R buttons become radio buttons. Only one track can be armed at a time for overdub recording. Tapping a different track automatically disarms the others.
Input Monitor (I)
When a USB audio device with 2 or more input channels is connected, the Mixer shows an INPUT MONITOR section with 4 I toggle buttons below the Record Arm buttons. These control what you hear through your headphones, independent of what records. With the built-in iPhone microphone these buttons are not shown because there is only one input source.
- White - Monitoring ON. You hear that track's input.
- Grey - Monitoring OFF.
When a USB device is plugged in, all tracks with configured routing automatically have monitoring enabled. When unplugged, monitoring resets to off.
10Cue Points
Cue points are saved markers that let you quickly navigate to specific moments in a recording.
Adding Cue Points
Enter CUE Add/Delete mode (tap CUE once), then press + at the desired position. Cue points are auto-numbered (CUE 001, CUE 002, etc.) and saved permanently with the recording.
Navigating Between Cues
Enter CUE Navigate mode (tap CUE twice), then use + and - to jump forward and backward between cue points. Press PLAY to start playback from the selected cue.
Deleting Cue Points
In CUE Add/Delete mode, press - to remove the most recently added cue point.
11Library
Tap the Library button to open the Reel Library where all your recordings are organized.
Browsing Recordings
Recordings are listed by date (newest first). Each entry shows the title, duration, track count, and file format. Tap any recording to load it into the main interface.
File Status
When using iCloud storage, a small icon next to each recording shows its current state:
- Local - The file is downloaded and ready to play instantly.
- Cloud - The file is stored in iCloud. Tap to download before playing.
- Downloading - A progress indicator appears while the file is being fetched from iCloud.
- Missing - The file could not be found. Check your iCloud connection.
Tags & Filtering
Create color-coded tags to organize your recordings. Tap a tag pill at the top of the library to filter. You can drag a recording onto a tag pill to assign it.
Actions
Swipe left on a recording to reveal actions:
- Share - Export via the system share sheet
- Rename - Change the recording title
- Tag - Assign or remove tags
- Delete - Permanently remove the recording
Long press any recording for a context menu with all available actions.
Bounce to Stereo
A multi-track project holds more than one track of audio (overdubs, layered takes, or simultaneous USB inputs across tracks 1-4). When a project has 2 or more tracks, a Bounce to Stereo option appears in the long press menu. This mixes the tracks down into a single stereo file using your current mixer settings (volumes, pans, mutes, solos), so the bounce sounds exactly like playback. The output uses your chosen export format and saves as a new recording in the library. Projects with only 1 track don't show the option, since there's nothing to mix down.
Import
Tap the import button to bring in audio files from your device. Supported formats: WAV, AIFF, and M4A.
The Files picker opens to the Reel folder by default. To import from Dropbox, Google Drive, iCloud Drive, or any other location, tap the back arrow in the top-left corner once to reach On My iPhone, then tap back again to reach Browse, where all your connected drives and cloud storage appear.
Batch Actions
Tap Select to enter selection mode. Choose multiple recordings, then use the action bar to share or delete them in bulk.
12Export & Sharing
Export Formats
| Format | Quality | Details |
|---|---|---|
| WAV | Lossless | Uncompressed 32-bit float PCM at up to 96kHz. Full dynamic range preserved with zero clipping. |
| AIFF | Lossless | Uncompressed alternative to WAV. Same quality. |
| M4A | Compressed | AAC codec at 256 kbps. Capped at 48kHz. Smaller file size. |
Auto-Normalize
When enabled in Settings, exported audio is normalized to 0 dB peak. This ensures consistent loudness across recordings without clipping.
Sharing
Share recordings via the iOS share sheet: AirDrop, email, Messages, Files, or any compatible cloud storage app.
Multi-track projects are packaged as a single .zip file so they travel as one attachment instead of a folder of separate tracks. Bounced and shared audio includes your current mix, so the recipient hears the same volume, pan, mute, and solo settings you last set in the Mixer.
13Settings
Audio Quality
- Sample Rate - 44.1kHz (CD quality), 48kHz (video standard), or 96kHz (high-resolution).
- Bit Depth - Every project is 32-bit float. All recording, mixing, and export is 32-bit float. There is nothing to configure.
Reel records in 32-bit float end to end. Any audio that arrives at a lower bit depth (16-bit or 24-bit from hardware that does not support 32-bit float) is converted to 32-bit float to match the project. This does not increase the resolution of the original audio, but it never degrades it either. Sample rate is honored when the connected hardware supports it:
| Audio Source | What You Get |
|---|---|
| USB audio interface (32-bit float) | Records natively in 32-bit float at up to 96kHz, stereo. No conversion, no clipping. |
| USB audio interface (16/24-bit) | Records at the interface's native bit depth, then converted to 32-bit float to match the project. |
| iPhone built-in mic | iOS limits the built-in microphone to 48kHz, 24-bit, mono. Reel converts this to 32-bit float for the project. |
How Sample Rate Works
Each new project locks to the sample rate of the recording input. The first source you record from sets the project rate, which is why the same Settings value can produce different project rates depending on what you plug in. This is by design: it stops Reel from ever silently upsampling audio.
- Built-in mic - iOS caps the built-in microphone at 48kHz. A new project that opens with the built-in mic as the input will lock to 48kHz, even if Settings is set to 96kHz.
- USB interface or instrument at 96kHz - The project opens at 96kHz from the start with no conversion.
- Mixed sources in one project - The first recording locks the rate. Any later track recorded at a different native rate is converted to match.
Switching project rate after recording
Once a track is recorded, you can switch the project to a different rate in Settings. Reel will convert the existing file up or down to match the new project rate. Converting up does not improve the original audio, it only aligns the file to the new project rate so everything plays back in sync.
After a switch, future recordings show both rates in the display, e.g. 48kHz > 96kHz. The left number is the native capture rate, the right number is the project rate. This way you always know what was recorded natively versus what was converted.
USB rate override
When a USB audio device is connected, the device decides the sample rate, not the Settings picker. The Sample Rate row in Settings becomes read-only and shows the device's actual rate with a note naming the device. Disconnect the device to regain control of the setting.
Microphone
- Source - Auto (system selects), Built-in, or External (when connected).
- Studio Vocal Mode - Enables Apple voice processing: noise reduction and echo cancellation. Ideal for voice recordings in noisy environments. Must be switched off when using a USB audio interface or instrument for multitrack recording.
- Recording Offset - Slider from -100ms to +100ms. Fine-tunes overdub alignment if new takes sound slightly ahead of or behind the existing tracks. Increase if vocals are late, decrease if early.
Input Monitoring
Input monitoring lets you hear your microphone or instrument in real time while you play or record. With a USB device connected, you control monitoring per-track using the I buttons in the Mixer (see Mixer section above). With the built-in mic, monitoring follows the current track automatically.
When is monitoring available?
| Setup | Monitoring | Reason |
|---|---|---|
| Built-in mic + iPhone speaker | Off | Prevents feedback loop between mic and speaker |
| Built-in mic + wired headphones | On automatically | No feedback risk with headphones |
| Built-in mic + AirPods, Bluetooth headphones, or Bluetooth speaker | Off by default | Bluetooth adds audio latency, and a Bluetooth speaker would feed back into the mic |
| USB interface + headphones into iPhone | On automatically | No feedback risk |
| USB interface + headphones into your interface | Off automatically | Your interface handles monitoring directly |
| Instruments (OP-1 Field) | On automatically | All 4 tracks monitored and routed on connection |
Monitor modes
The In/Out sheet always shows a monitor toggle with three options:
- Auto - Monitoring is on when idle or recording, and mutes during playback so you only hear the recorded tracks
- On - Always monitoring, even during playback
- Off - Monitoring disabled
The toggle is greyed out and locked to Off when you're on the built-in mic with the iPhone speaker. This prevents a feedback loop. Plug in headphones, AirPods, a Bluetooth speaker, or a USB device and the picker becomes active.
On Bluetooth outputs (AirPods, Bluetooth headphones, Bluetooth speakers), monitoring defaults to Off each time you connect, because of Bluetooth's audio delay and the feedback risk with speakers. You can switch it On for the session. When Bluetooth disconnects, your previous (non-Bluetooth) setting comes back. USB interfaces are different: each one remembers its own monitoring choice and restores it the next time you connect that device.
Reel remembers your monitoring preference and per-track monitor state for each device. When you reconnect the same interface, your settings are restored automatically.
Interface
- Haptic Feedback - Toggle on/off. Controls haptic response for buttons and disc interaction.
- Disc Sensitivity - 1 (slow, precise) to 10 (fast, broad navigation). Default is Level 5. Reset button returns to default.
- Large Buttons - Accessibility option that scales up the smaller round controls (modes like Cue, Loop, Pitch and menus like In/Out, Library, Settings) to a 44 pt tap target for easier reach.
- Appearance - System (follows your iPhone's appearance setting), Light, or Dark. Defaults to System.
Storage
- Location - iCloud Drive (syncs across devices) or On My iPhone (local only).
- Current storage usage and available space are displayed.
Export
Set your default export format: WAV, AIFF, or M4A. Auto-Normalize is an optional toggle that peak-normalizes to -0.1 dB on export only - your source recording is never modified.
Data Management
Delete All Recordings removes every recording from your device (and iCloud if enabled). This action cannot be undone. A confirmation prompt appears before anything is deleted.
Feedback & Diagnostics
- Share Session Log - Exports a log of the current session. Useful when reporting a bug or unusual behavior.
- Email Developer - Opens a pre-filled email to the Reel support address.
Purchases
Restore Purchases re-syncs any in-app purchases tied to your Apple ID, including the Reel Founder unlock. Use this if you reinstall Reel or switch to a new device.
About & Legal
Shows the current app version, links to the Privacy Policy, Terms of Service, and online User Manual, and a support email link.
14Workflows
Multi-Track Band Recording
- Record the first instrument/part on Track 1.
- Press + to select Track 2, then tap REC. Track 1 plays back while Track 2 records.
- Repeat for Tracks 3 and 4.
- Open the Mixer to adjust volume and pan for each track.
- Use Mute/Solo to focus on specific parts during review.
- Export the final mix from the Library.
Loop Recording
- Record or load an existing track.
- Tap LOOP to enter Recording mode.
- Press + at your desired start position to set the IN point.
- Press - at the end position to set the OUT point.
- Tap LOOP again to enter Playback mode - audio now loops seamlessly.
- Select a new track and tap REC to overdub within the loop.
Punch-In Re-Recording
- Load the project you want to fix.
- Use the disc or cue navigation to seek to the section that needs re-recording.
- Select the target track with +/-.
- Tap REC to begin punch-in recording at that position.
- Tap STOP or PLAY to finalize. The new audio replaces the original from the punch-in point.
Speed & Pitch Adjustment
- Tap PITCH to enter Adjusting mode.
- Rotate the disc to set your desired speed (25%–300%).
- Tap PITCH again to lock the speed.
- Press PLAY - playback runs at the locked speed. Useful for transcription (slow) or quick review (fast).
- Tap PITCH once more to reset to 1.0x.
15USB Audio Devices
Auto-Routing
When you plug in a USB audio device for the first time, Reel automatically routes stereo input pairs to tracks so you see input signal immediately. No manual configuration needed. Per-device preferences are saved and restored on subsequent connects.
Single-channel (mono) interfaces are supported too. Reel reads the interface's own channel layout, so a one-input device records correctly to a track.
When a USB device is unplugged, Reel resets to Track 1 and disarms all other tracks.
OP-1 Field
The OP-1 Field outputs 8 channels over USB, allowing true multi-track recording - one track per channel pair. Reel auto-routes all 4 stereo pairs to tracks 1-4 and enables monitoring on all tracks. Before connecting:
- On the OP-1 Field, go to System > USB Mode.
- Set USB Mode to 8ch.
- Connect to your iPhone via USB-C and select the OP-1 Field as your input in Reel.
Original OP-1
The original OP-1 is limited to 2-channel USB output - all 4 tracks are mixed into a single stereo pair. To record each track individually into Reel, use this workaround:
- In Reel's Mixer, set the channel input for all 4 tracks to the stereo output 1–2 from the OP-1.
- On the OP-1, mute tracks 2, 3, and 4 - leave only track 1 playing.
- In Reel, arm Track 1 (shown as 01 on the main display) and record.
- Next, on the OP-1, solo track 2 (mute 1, 3, 4). In Reel, press + to arm Track 2 and record.
- Repeat for tracks 3 and 4.
16Audio Specifications
| Specification | Options |
|---|---|
| Sample Rates | 44.1 kHz, 48 kHz, 96 kHz |
| Bit Depth | 32-bit float (recording, mixing, and export) |
| Recording Format | WAV (32-bit float PCM, uncompressed) |
| Export Formats | WAV, AIFF (both 32-bit float), M4A (AAC) |
| Max Tracks | 4 stereo tracks per project |
| Max USB Inputs | 8 channels (4 stereo pairs) |
| Pitch/Speed Range | 25% – 300% |
| Supported Devices | iPhone, iOS 18+ |